Choosing between hydraulic and manual tool clamping is not simply a matter of deciding whether to spend more on automation. It directly affects how quickly operators can change punches and dies, how safely tooling is handled, and how efficiently a press brake moves between production jobs. Manual clamping remains a practical, economical option for workshops with relatively stable tooling setups, while hydraulic clamping offers faster changeovers for high-mix production and frequent tool changes. And between the two sits a third option many buyers overlook: the mechanical quick-clamp.
The right choice depends on four things, and none of them is “which technology is more advanced”:
- Your tooling interface — the tang style your punches and dies already use restricts which clamps will accept them.
- Changeover frequency — the hydraulic premium buys speed, and speed only pays where tool changes actually happen.
- Machine condition and beam dimensions — especially on a retrofit.
- Total cost of ownership — hardware is the smallest part of it.
1. Manual Tool Clamping: From Set Screws to Quick Clamps
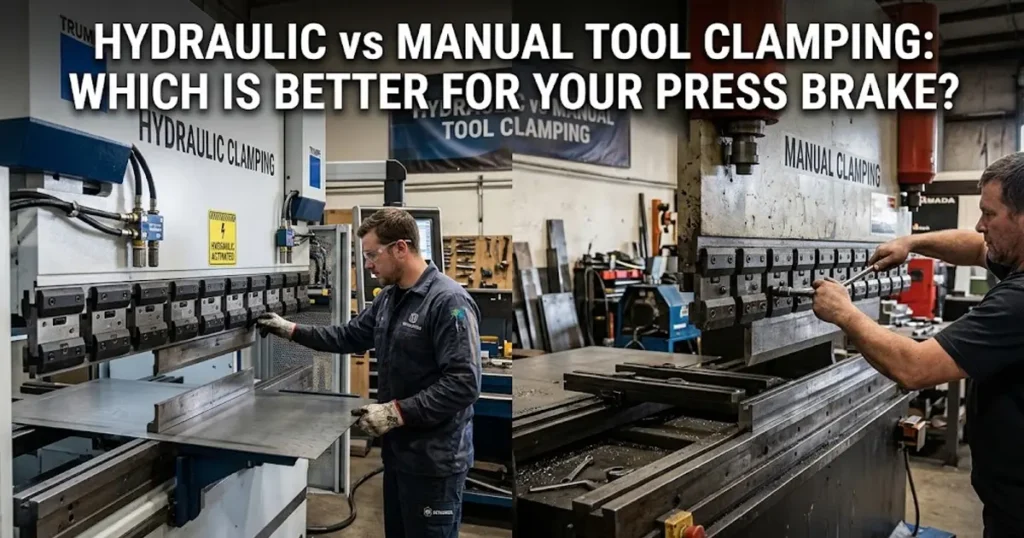
Manual tool clamping uses mechanical components — bolts, screws, cam mechanisms, or wedge-operated pressure plates — to secure punches and dies. Two arrangements matter for the buying decision.

Traditional Manual Screw Clamping
Traditional screw clamping relies on bolts or threaded fasteners applying pressure directly to the tooling. A tool change means: loosen the clamping bolts, remove or reposition the punch, install the replacement, align it, tighten the bolts in sequence, and confirm the tool is seated and secured.
The arrangement is straightforward and inexpensive. Its weaknesses are physical: changing a long punch or multiple segments is demanding work, and fasteners tightened unevenly leave tooling seating inconsistently — which is why correct installation procedure matters as much as the hardware.
Manual Quick-Clamping Systems
Manual quick clamps keep the mechanical principle but remove the wrench. A rotary handle, cam mechanism or wedge assembly releases and secures the punch in one motion, and many designs add safety grooves, locking hooks and adjustable pressure plates. As one clamping-system review in The FABRICATOR describes it, the operator inserts the tool into the clamp and slides a removable lever to secure it — no set screws, no hand tool, and no power source connected, which also means very little that can fail (Steve Brown, The FABRICATOR).
The important distinction: manual does not necessarily mean slow. A modern mechanical quick-clamp can be considerably faster than traditional bolt-based holders, without adding a hydraulic system to maintain. For many shops it is the rational middle option, not a compromise.
2. Hydraulic Tool Clamping: How It Works

Hydraulic tool clamping uses hydraulic pressure to actuate the clamping mechanism and secure punches or dies. Instead of tightening each locking point by hand, the operator presses a button or switch, and compatible tooling is clamped along the entire beam at once.
A typical sequence:
- The operator positions the compatible punch in the upper clamping holder.
- The hydraulic circuit supplies pressure to the clamping mechanism.
- Internal pressure elements move against the tooling — in current designs, a bladder exerts pressure on individual clamping pins placed at close intervals along the holder, and springs release the pins the moment pressure drops (Gunter Glocker, Canadian Metalworking).
- The punch is seated and secured against the designated reference surfaces.
- The operator verifies clamping status — many systems provide an indicator light for exactly this — before production begins.
The practical advantages follow from that sequence:
- Faster tool changes — push-button operation replaces repetitive manual tightening.
- Consistent actuation — controlled clamping across the holder’s working range, on every change.
- Reduced operator effort — no locking screws to work through on every changeover.
- Integration potential — clamping can be tied into the machine’s controls and hydraulic power system.
Hydraulic clamping is not maintenance-free: pressure, seals, connections and pressure-retention components all need inspection per the manufacturer’s requirements. What that means in practice is covered in Section 9.
3. Hydraulic vs Manual Tool Clamping: Key Differences
The main difference is how clamping force is generated and how operators control the locking mechanism.
| Comparison Factor | Manual Clamping | Hydraulic Clamping |
|---|---|---|
| Clamping operation | Mechanical screws, cams, or wedges | Hydraulic actuation |
| Tool change procedure | Manual operation per segment | Push-button, full beam at once |
| Setup speed | Depends on clamp design | Generally faster for frequent changeovers |
| Operator effort | Higher with traditional screw clamps | Lower during normal operation |
| Initial investment | Generally lower | Generally higher |
| System complexity | Relatively simple | More complex |
| Maintenance | Cleaning, lubrication, mechanical inspection | Hydraulic fluid, seals, connections, pressure checks |
| Power requirements | Usually no hydraulic power required | Requires a suitable hydraulic power source |
| Compatibility | Depends on clamp and tooling profiles | Depends on hydraulic holder and tooling interface |
| Best application | Stable setups and occasional changes | Frequent changes and higher-throughput production |
4. Which Is Better in Actual Production? Four Scenarios
The comparison table explains the technical differences, but the best choice becomes clearer against real workshop conditions.
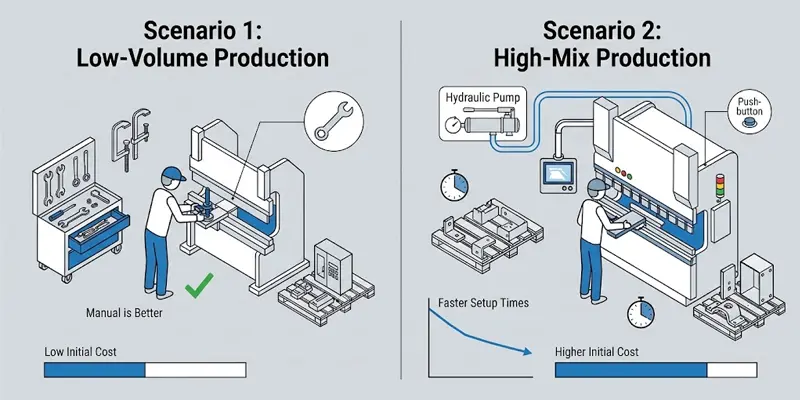
Scenario 1: Low-Volume Production With Few Tool Changes
A small workshop producing standard electrical cabinet panels — mostly the same punches and dies, tooling changed only occasionally — will find manual clamping the more economical choice. Configurations stay stable, changeovers do not interrupt production much, and the hydraulic investment would sit idle with a long payback period. A well-designed manual quick-clamp gives the best balance of cost, convenience and reliability here.
Scenario 2: High-Mix Production With Frequent Changeovers
Job shops producing brackets, enclosures, frames and custom work change several tooling sections multiple times per shift. Here hydraulic clamping becomes attractive: less time on locking operations, faster transitions between jobs, less physical effort, more machine utilization. Where setup time is the production constraint, the hydraulic premium has something concrete to pay for.
Scenario 3: Long Punches and Segmented Tooling
Long tooling raises two separate problems — one about people, one about geometry.
The people problem is handling: with traditional manual clamping, a long punch means loosening and tightening multiple fastening points along the beam, and a full-length planed punch is heavy enough that fabricators describe needing a forklift to load 13-ft tooling before their retrofit (a fabricator’s published account of its own upgrade — The FABRICATOR).
The geometry problem is seating. Early hydraulic designs used a single clamping bar pressing on all segments in its length; small tolerances in tang height or a bar tilting slightly along its length meant some segments received less clamping force than others — and a lightly clamped segment is a segment that can move under side load. The symptom downstream is an angle that drifts along the workpiece, a family of problems we diagnose in our article on why a bend angle varies along the part. Individual clamping pins, each pressing on its own segment, eliminate the shared-bar failure mode, which is why current hydraulic holders use pins at close intervals (Glocker, Canadian Metalworking). For segmented tooling with slight thickness variations, also look for compliant inserts or per-segment pressure compensation.
There is a third, quieter geometry effect: punch height arithmetic. A hydraulic clamp is typically a one-piece beam, and that solid beam sits above the punch consuming open height — so bending a deep box requires a punch tall enough to clear the finished flange plus the clamp. Segmented mechanical holders can act as an extension of the punch height instead, letting a short punch seat low in a tall holder. The same deep-box part can be routine on one machine and impossible on another for exactly this reason; the forming-side geometry is covered in our article on Glocker, Canadian Metalworking.
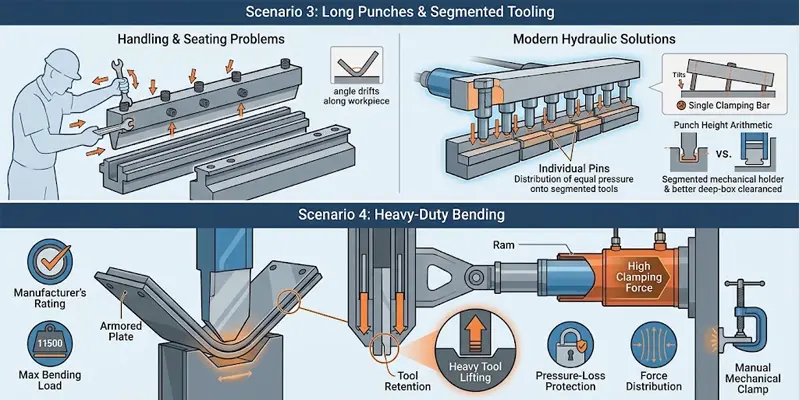
Scenario 4: Heavy-Duty Bending Applications
For thick plate and high-tonnage work, clamping capacity becomes a selection criterion in its own right — clamping systems engineered for heavy tooling exist specifically to lift, seat and hold large punches and carry high loads per foot (Canadian Metalworking). But do not assume hydraulic automatically means stronger. Before selecting any system, verify:
- The manufacturer’s rated clamping force.
- Permitted tooling weight and geometry.
- Maximum allowable bending load.
- Clamping force distribution along the beam.
- Tool retention and pressure-loss protection.
- Compatibility with the machine’s operating conditions.
Manual mechanical clamps also provide reliable retention when properly engineered and used within their rated capacity. The requirement is that the complete tooling-and-clamping arrangement is approved for the intended application.
5. How Much Time Can Hydraulic Clamping Save?

Changeover time drives the return-on-investment calculation, but a fair calculation has to separate two different things: the time to operate the clamp and the total time to complete a tool change. A complete changeover includes releasing the old tooling, handling punches and dies, cleaning mounting surfaces, installing replacements, aligning, verifying the setup, loading the program and test bending. Hydraulic clamping mainly compresses the locking and unlocking portion — it does not eliminate the rest.
A hypothetical illustration: a workshop changes tooling eight times per shift. Clamping and releasing by hand takes roughly five minutes per change; by button, about one. That is four minutes saved per change, or 32 minutes per shift — around 130 hours of recovered time a year over 250 working days. These figures are a hypothetical illustration, not a performance guarantee: actual savings depend on clamp design, tooling length, operator procedures, and what share of the total changeover the clamping operation represents.
The financial frame is simple:
- Annual value ≈ hours saved per year × value of productive machine time.
- Payback period = total upgrade cost ÷ annual net savings.
For a realistic assessment, include installation, hydraulic power requirements, maintenance, training, and any adapter or tooling modifications. If your workshop performs one or two changes per day, manual clamping likely remains the more economical option; at frequent changeovers across several machines, the hydraulic return strengthens considerably.
6. Safety: What Should You Consider Before Choosing a Clamping System?
Press brake punches and dies are heavy, awkward to handle and expensive to replace, and a clamp has to do two jobs: hold tooling securely during bending, and reduce the risk of accidental movement or falling during installation and removal.
For manual clamping, check for: mechanical safety grooves or retention hooks; secure locking mechanisms; clearly defined tightening procedures; accessible inspection points; support rated for the intended punch weight. Some quick-clamp designs use a mechanical hook or safety catch that retains the punch even after the primary clamp is released — an important feature when operators handle heavy upper tooling.
For hydraulic clamping, the powered mechanism adds failure modes manual clamping does not have. A sudden pressure loss, damaged hose or electrical interruption can affect clamping if the system lacks protection. Check for: pilot-operated check valves or equivalent pressure-retention devices; clamping-status indication; hydraulic circuit protection; documented release procedures; and mechanical tool-retention features where fitted. Not every hydraulic clamp uses the same safety architecture — never assume pressure will remain indefinitely after a power failure, and never treat hydraulic pressure as a substitute for safe tool-handling procedure.
There is also a human failure mode specific to powered clamping: a tool loaded but never actually clamped. One fabricator that retrofitted its brakes found operators forgetting to lock tools into the beam before bending, and resolved it by installing an interlock that prevents ram movement until tools are locked in their holders — that fabricator’s own account (The FABRICATOR). Whatever system you buy, clamped-status confirmation plus mechanical anti-drop retention is the combination to insist on.
7. Compatibility: Can You Upgrade an Existing Press Brake?
The most common question from workshop owners is whether an existing machine can take a clamping upgrade without buying a new brake. Often it can — but compatibility must be confirmed on three levels before any purchase.
Check the Tooling Interface
A clamp is not a generic accessory: it has to hold the specific tang geometry your tooling was made with. The main families and what each accepts:
| Tooling interface | Standard manual (screws/plates) | Quick-change manual (cam lever) | Hydraulic clamping | What to watch |
|---|---|---|---|---|
| American-style (straight 0.5 in tang) | Yes — the traditional pairing | Available | Yes, in American-style hydraulic holders | Newer punches may carry a self-seating groove; older planed tools seat less predictably |
| European / Promecam (13 mm offset tang, safety slot) | Yes | Very common | Very common | Safety slot must orient correctly; check holder width against segment lengths |
| New Standard / WILA-style (20 mm double-sided tang) | No | No | Yes — designed around hydraulic clamping | Tools click into the holder and clamp hydraulically; no screw-clamp equivalent |
| Amada-style, Trumpf-style, proprietary | Case by case | Case by case | Case by case | Confirm tang dimensions against the clamp maker's drawings |
Two rows matter most in practice. If your shop is committed to New Standard (WILA-style) tooling, the clamping question is largely settled — that system’s holders and vertical-loading workflow are built around hydraulic clamp beams, and our WILA tooling page covers how the tooling locks and seats. And if you run mixed tooling, note that a clamp matched to one interface will not accept another; the compatibility mechanics between families — tang widths, safety slots, holder heights — are covered in depth in our tooling compatibility guide.
Check the Machine Beam and Mounting Dimensions
Before ordering, collect:
- Press brake manufacturer and model.
- Machine beam dimensions.
- Existing clamp mounting-hole spacing.
- Upper tooling interface.
- Lower die holder configuration.
- Required clamping length.
- Maximum punch and die dimensions.
- Available hydraulic connections and power supply.
For older machines, the mounting arrangement may require a custom intermediate adapter, engineered to maintain rigidity, mounting accuracy and load-bearing capacity.
Check Hydraulic Integration
For hydraulic retrofits, evaluate available pressure and flow, power-pack requirements, hose routing, control-circuit compatibility, pressure monitoring and interlocks, and the space around the beam. A retrofit should be assessed as a complete mechanical-and-hydraulic system, not a swapped pressure plate.
CAMT provides manual, hydraulic and pneumatic clamping configurations with retrofit solutions for compatible press brakes — the range is on our tooling clamping systems page.
8. Maintenance: Manual vs Hydraulic
Both systems need routine inspection, but the maintenance categories differ.
| Maintenance Item | Manual Clamping | Hydraulic Clamping |
|---|---|---|
| Remove metal dust and debris | Regularly | Regularly |
| Inspect clamping surfaces | Regularly | Regularly |
| Check locking components | Bolts, wedges, cams, screws | Pistons, pressure elements, locking components |
| Lubrication | Designated mechanical contact points | Per specification |
| Inspect seals | Generally not applicable | Seals and O-rings |
| Check hydraulic pressure | Not required | Per manufacturer specification |
| Inspect hoses and fittings | Not applicable | Required |
| Check pressure-retention devices | Only where fitted | Required where fitted |
Common manual clamp problems: loose fasteners from vibration or worn threads; worn wedge mechanisms affecting contact surfaces; uneven clamping from damaged pressure plates; contamination — chips between punch and holder interfering with seating.
Common hydraulic clamp problems: leakage from damaged seals, fittings or hoses; insufficient clamping pressure from incorrect settings or supply problems; slow response from restricted flow or wear; pressure-retention failure from a defective check valve.
For both systems, inspect the clamping arrangement before production, and investigate any abnormal movement, visible damage or suspected clamping-force loss before running the machine. These checks fold into the hydraulic and inspection routines on a standard press brake maintenance schedule.
9. How to Choose the Right System for Your Workshop
Rather than choosing hydraulic because it is more advanced, match the system to the production reality:
| Selection Factor | Manual Clamping | Hydraulic Clamping |
|---|---|---|
| Low production volume | Excellent fit | May be unnecessary |
| Occasional tool changes | Good fit | Limited additional benefit |
| Frequent job changes | Depends on quick-clamp design | Strong fit |
| High-mix production | Suitable with efficient mechanical clamps | Often preferable |
| Limited investment budget | Strong fit | Higher initial investment |
| Multiple operators and shifts | Depends on standardization | Can simplify repeated operation |
| Automated production | Limited integration | Better integration potential |
| Existing machine retrofit | Often straightforward | Requires compatibility checks |
Read together: choose manual — ideally a mechanical quick-clamp — when production is stable, tool changes are infrequent, and budget is tight; choose hydraulic when changeovers are frequent, setup time constrains utilization, multiple shifts share machines, or automation is planned. Quick-change manual systems cost more than standard clamps but far less than powered ones, which is why for repetitive high-volume work on predictable setups the mechanical middle path is often the sharpest buy (Brown, The FABRICATOR). And the interface matrix in Section 8 overrides this table wherever your tooling says otherwise.
11. CAMT Tooling Clamping Solutions for Different Production Requirements
Selecting a clamping system requires more than comparing actuation types — the clamp must match the machine beam, tooling standards, production load and changeover requirements. CAMT supplies press brake tooling clamping solutions across that full range:
- Manual quick-clamping systems — faster tool changes without a hydraulic system; depending on configuration, with mechanical safety retention, wedge locking, adjustable pressure elements and support for different tooling arrangements.
- Hydraulic clamping systems — push-button actuation for frequent-change production, configurable for compatible tooling standards, with retrofit options.
- WILA-compatible precision solutions — for WILA-style tooling, an upgrade path with front-to-back alignment and vertical parallelism adjustment; pairable with WILA Smart Tooling for digital tool identification and tooling data management.
- Complete tooling support — tooling and storage solutions for organized storage and safer handling, and technical support for troubleshooting, retrofits and operational assistance.
Considering the press brake, tooling, clamping arrangement and tool management process together is what turns a clamp purchase into a productivity upgrade. The machine-side options are on our CNC press brake range.
Tooling decisions rarely stop at one choice. The press brake tooling guide covers the styles, standards and load limits that frame this one.
12. Frequently Asked Questions About Hydraulic vs Manual Tool Clamping
Is hydraulic tool clamping better than manual clamping?
Neither is universally better. Hydraulic clamping wins where changeovers are frequent; manual clamping wins where setups are stable and budget matters. The deciding inputs are changeover frequency, tooling interface, machine condition and total ownership cost — work them in that order.
Does hydraulic clamping improve press brake bending accuracy?
Not by itself. Hydraulic clamping does not change the machine’s inherent accuracy, but consistent actuation removes clamp-induced seating variation between setups. Machine condition, tooling geometry, material and compensation still govern the rest.
Can manual quick clamps replace traditional screw clamps?
Yes, provided the quick-clamp is compatible with the machine and tooling. Mechanical quick clamps simplify installation and removal without requiring any hydraulic actuation.
Can I install hydraulic clamping on an older press brake?
In many cases, yes. Beam dimensions, mounting arrangement, tooling interface, hydraulic supply and control requirements all need checking first, and some machines require custom adapter bars. Work through the checklist in Section 8 before ordering.
Is hydraulic clamping safer than manual clamping?
Not automatically. Both are safe when properly designed, rated, installed and maintained. Hydraulic systems should include pressure-loss protection and status indication; mechanical clamps should provide reliable locking and tool retention. Training and safe tool-handling procedures remain essential either way.
Does hydraulic clamping work with European, Amada and WILA tooling?
Each interface has hydraulic clamp families built for it, but they are separate clamp models rather than one universal body — and New Standard (WILA-style) tooling works only in its matching hydraulic holders. See the interface matrix in Section 8.
How often should a press brake clamping system be inspected?
Inspect before production and follow the manufacturer’s maintenance schedule. Manual clamps need attention to locking components, contact surfaces and lubrication points; hydraulic clamps add pressure, seals, hoses and pressure-retention checks.
Is hydraulic clamping worth it for a small workshop?
Only if tool changes are frequent enough for the recovered time to matter. If most jobs run on the same tooling, a manual quick-clamp is usually the more economical choice; if changeovers consume significant production time, run the payback calculation in Section 6.
Conclusion: Choose Clamping Based on Production Requirements, Not Just Technology
Both systems have a permanent place in modern sheet metal fabrication. Manual clamping offers simplicity, lower investment and reliable operation for stable tooling requirements; hydraulic clamping delivers convenience and speed where frequent tool changes are the norm. The most important consideration is not which technology is more advanced, but which combination of safety, compatibility, productivity and total ownership cost fits your workshop.
If you are planning a new press brake or an upgrade to an existing machine, CAMT can evaluate your tooling standards, machine dimensions and changeover requirements, and recommend a configuration. Contact CAMT to discuss your clamping requirements and request a recommendation for your production needs.